
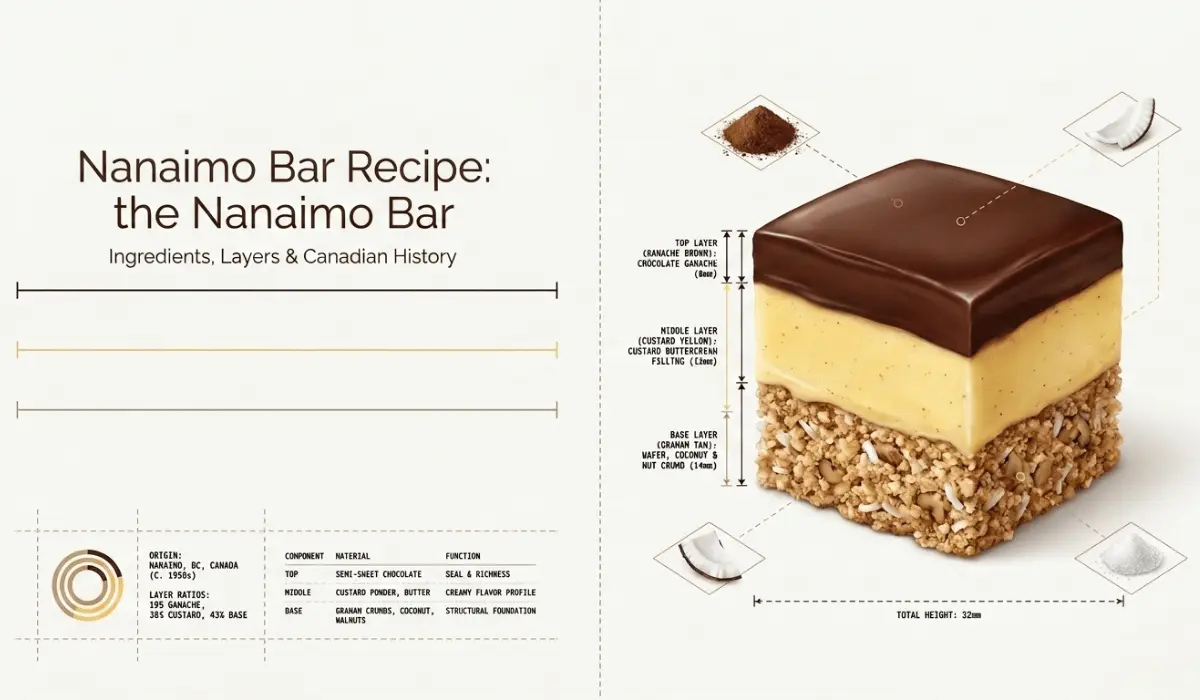
Few Canadian desserts inspire as much debate as the Nanaimo bar—not because anyone doubts that it’s delicious, but because its history is surprisingly difficult to pin down. Who invented it? When did it first appear? And what exactly should the middle layer be called?
What almost everyone agrees on is the basic formula: a rich chocolate-coconut base, a sweet custard-flavoured filling, and a smooth layer of chocolate on top. No oven required.
Traditional Nanaimo Bar at a Glance
- Prep time: About 25 minutes
- Chill time: 1 to 1½ hours
- Total time: About 1½ hours
- Makes: 16 squares
- Pan: 8-inch square pan (about 20 × 20 cm)
- Storage: Up to 5 days in the refrigerator
- Freezer-friendly: Yes, for up to 2 months
A traditional Nanaimo bar is a three-layer Canadian no-bake dessert made with a chocolate-coconut crumb base, a custard-powder buttercream filling, and a thin chocolate topping.
What Is a Nanaimo Bar?
A Nanaimo bar is a no-bake square built from three distinct layers, each with a different texture.
The bottom layer is dense and slightly crumbly, made with graham wafer crumbs, cocoa, coconut, butter and, in many traditional versions, chopped walnuts. The middle is a soft, sweet filling flavoured with custard powder, which gives it its familiar pale yellow colour and mild vanilla-like taste. On top sits a thin layer of chocolate that firms up in the refrigerator.
Unlike a baked brownie or cake, the Nanaimo bar relies entirely on chilling to set its layers. That is why patience matters here. If the base has not cooled enough before the filling goes on—or if the chocolate is poured over a filling that is still too soft—the layers can slide together and make cutting difficult.
Where Does the Nanaimo Bar Come From?
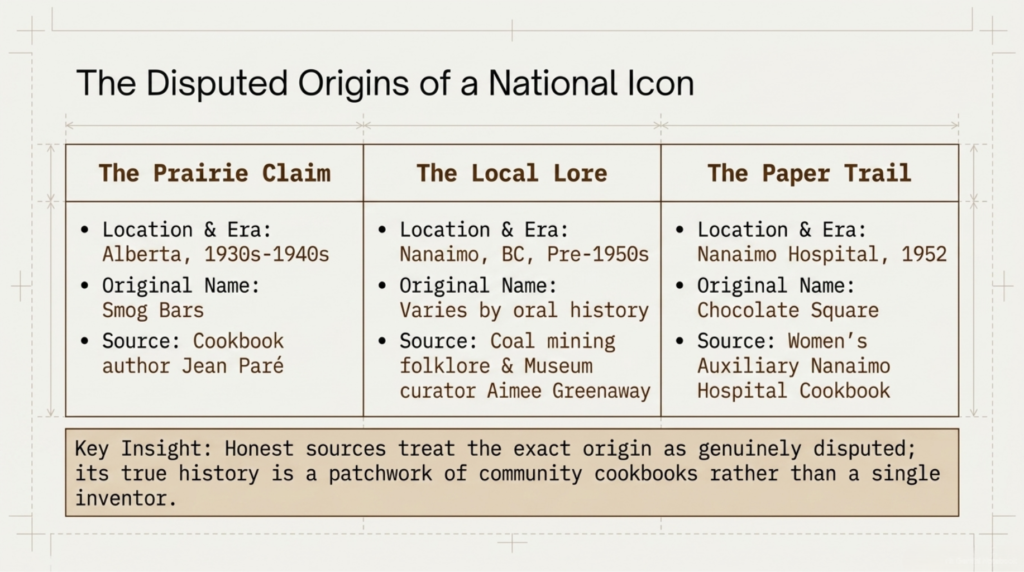
The dessert is named after Nanaimo, British Columbia, and the city has become closely associated with it. The exact origin, however, is still disputed.
The clearest documented trail points to community cookbooks from the early 1950s. A recipe resembling the modern dessert appeared in the 1952 Women’s Auxiliary Nanaimo Hospital Cookbook under the name “chocolate square.” A similar recipe appeared the following year in the Edith Adams’ Cookbook using the name “Nanaimo bar.”
That does not necessarily mean the dessert was invented in Nanaimo. Similar no-bake chocolate-and-crumb squares appear in Canadian baking traditions under different names, and several stories suggest that related versions existed elsewhere before the 1950s.
Nanaimo Museum curator Aimee Greenaway has noted that the dessert’s folklore varies depending on who tells the story. Some accounts connect similar recipes to Nanaimo’s coal-mining era, while cookbook author Jean Paré recalled versions made in Alberta during the 1930s and 1940s that her family called “smog bars.”
Some earlier origin stories have proved difficult to verify. Claims about a 1930s “Chocolate Fridge Cake,” for example, have not been confirmed through surviving newspaper archives.
So the most accurate answer is also the least dramatic: the Nanaimo bar’s exact invention remains uncertain, but Nanaimo played the central role in naming, popularising and eventually turning the dessert into a Canadian icon.
That connection became even stronger in 1986, when Nanaimo held a contest to find the city’s ultimate Nanaimo bar recipe. Nearly 100 recipes were submitted, and Joyce Hardcastle’s winning version became one of the best-known modern interpretations of the dessert.
The Three Layers, Explained
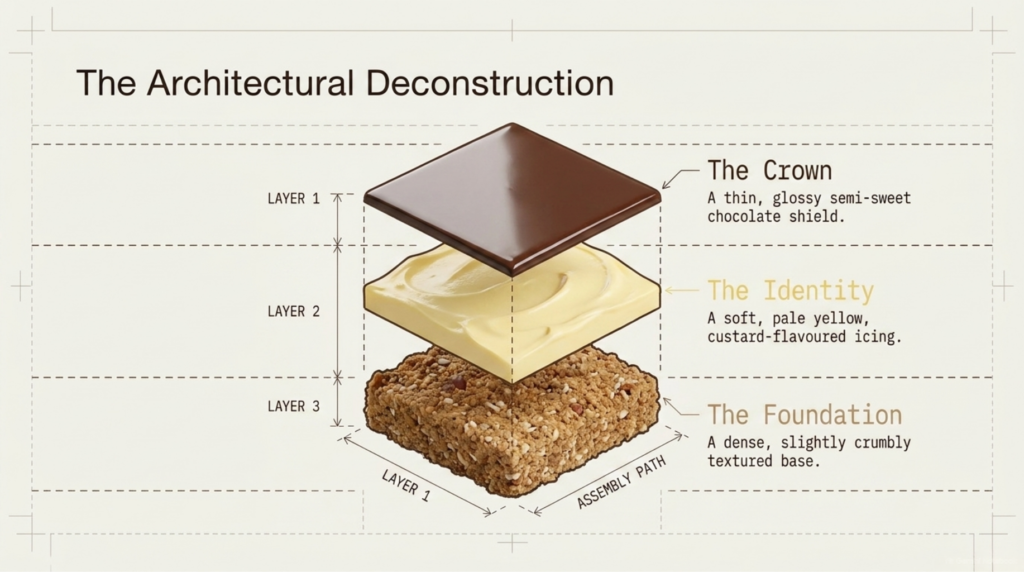
1. The Chocolate-Coconut Base
The bottom layer provides structure and texture. Traditional recipes generally combine:
- Graham wafer crumbs
- Unsweetened cocoa powder
- Shredded coconut
- Butter
- Sugar
- Egg
- Chopped walnuts
The butter, sugar, cocoa and egg are gently heated together before the dry ingredients are added. This helps bind the mixture so the finished base holds together when sliced.
The result should be firm enough to support the filling but not so hard that it becomes difficult to bite through.
2. The Custard Filling
This is the layer that makes a Nanaimo bar immediately recognisable.
Despite being called a custard filling, it is not a cooked custard. Traditional versions use custard powder—often Bird’s custard powder—mixed with butter, icing sugar and a small amount of milk or cream.
The result is closer to a flavoured buttercream than a traditional egg custard.
Custard powder is important because it provides both flavour and colour. Instant pudding mix is not an identical substitute and can change the texture significantly.
3. The Chocolate Topping
The final layer is usually made with semi-sweet chocolate and a little butter.
The butter helps keep the chocolate from becoming overly brittle once chilled. A good topping should firm up enough to hold its shape while still cutting cleanly instead of breaking into large shards.
Traditional Nanaimo Bar Recipe
Ingredients
For the Base
- ½ cup unsalted butter
- ¼ cup granulated sugar
- 5 tablespoons unsweetened cocoa powder
- 1 large egg, beaten
- 1¾ cups graham wafer crumbs
- 1 cup shredded coconut
- ½ cup finely chopped walnuts
For the Custard Filling
- ½ cup unsalted butter, softened
- 3 tablespoons milk or cream
- 2 tablespoons custard powder
- 2 cups icing sugar
For the Chocolate Topping
- 4 ounces (about 115 g) semi-sweet chocolate
- 2 tablespoons unsalted butter
How to Make Nanaimo Bars
Step 1: Make the Base
Line an 8-inch (20 cm) square pan with parchment paper, leaving a little overhang on the sides to make the finished bars easier to lift out.
In a saucepan over low heat, melt the butter with the sugar and cocoa powder, stirring until smooth.
Add the beaten egg slowly while stirring constantly. Keep the heat low and continue stirring for about 1 to 2 minutes, until the mixture thickens slightly. Do not allow it to boil, as the egg can scramble.
Remove the pan from the heat.
Stir in the graham wafer crumbs, shredded coconut and chopped walnuts until everything is evenly coated.
Press the mixture firmly and evenly into the prepared pan. Refrigerate for about 20 to 30 minutes, or until the base feels firm.
Step 2: Make the Custard Filling
In a bowl, beat the softened butter until smooth.
Add the milk or cream and custard powder, then gradually beat in the icing sugar until the mixture becomes smooth and spreadable.
Spread the filling evenly over the chilled base. Take your time with this step—the smoother the filling, the cleaner the finished layers will look.
Return the pan to the refrigerator for another 20 to 30 minutes, until the filling has firmed up.
Step 3: Add the Chocolate Layer
Melt the semi-sweet chocolate and butter together in a heatproof bowl over gently simmering water, or microwave in short intervals, stirring between each interval until smooth.
Let the chocolate cool for a few minutes. It should still be pourable, but not hot enough to soften the custard layer.
Pour the chocolate over the chilled filling and gently spread it into an even layer.
Return the pan to the refrigerator.
Step 4: Cut the Bars
Chill the Nanaimo bars for about 30 to 60 minutes.
The ideal time to cut them is when the chocolate has set but is not completely rock-hard.
Use a sharp knife warmed under hot water and dried thoroughly. Wipe the blade clean between cuts for neater squares.
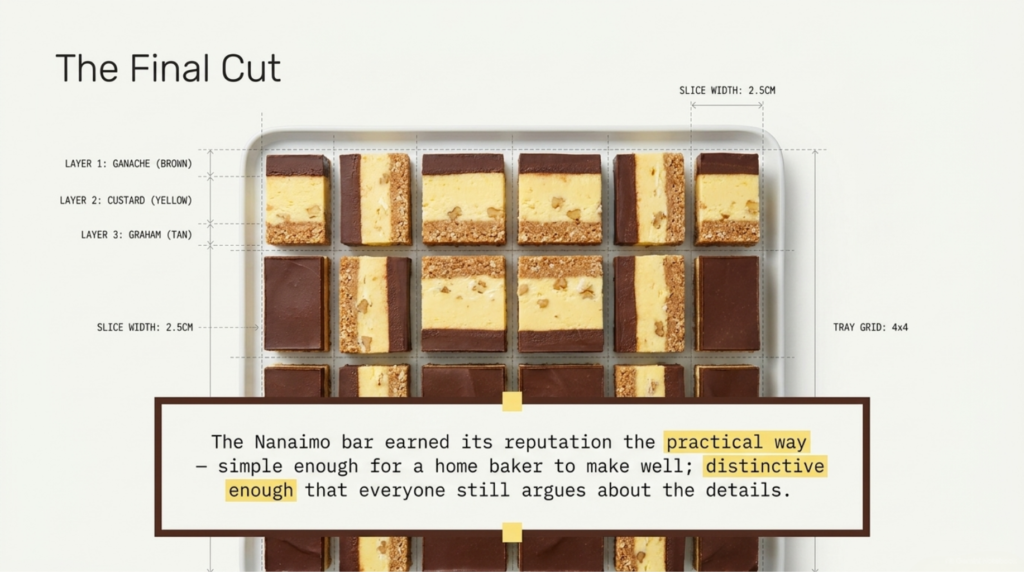
For 16 servings, cut the slab into four rows by four rows.
Common Nanaimo Bar Problems—and How to Avoid Them
The Chocolate Layer Cracks
This usually happens when the chocolate is allowed to become completely hard before cutting.
Try cutting the bars when the chocolate is set but still slightly soft. A warm, dry knife also helps create cleaner edges.
The Filling Is Too Soft
The middle layer may need more chilling time, or the butter may have been too warm when the filling was made.
Refrigerate the filling until it feels firm before adding the chocolate.
The Layers Slide Apart
This often happens when the layer underneath has not had enough time to chill.
Each layer should be reasonably firm before the next one is added.
The Base Crumbles When Cut
Make sure the base ingredients are thoroughly combined and pressed firmly into the pan. Also allow enough time for the butter and egg mixture to set in the refrigerator.
Regional and Modern Variations
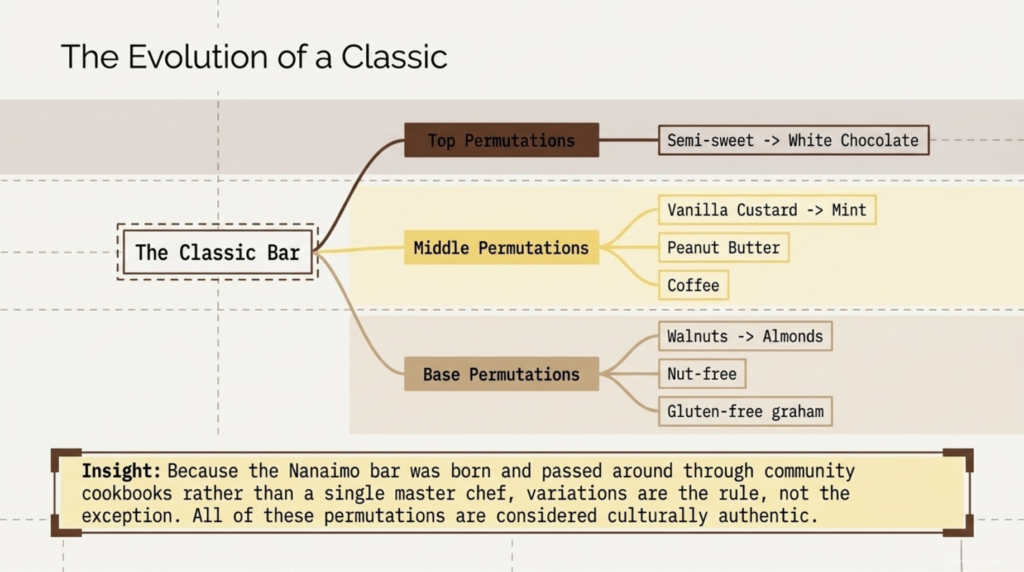
Part of the Nanaimo bar’s appeal is how easily it adapts.
Some versions leave out the walnuts or replace them with almonds or pecans. Others flavour the middle layer with mint, coffee, peanut butter or orange. White chocolate toppings are also popular, while gluten-free versions often use alternative crumbs in place of traditional graham wafers.
These versions are not the classic recipe, but they reflect the way the dessert has travelled and changed over time.
That flexibility is part of the Nanaimo bar’s history. It was never a dessert controlled by one bakery or one official recipe. It spread through community cookbooks, family kitchens and local adaptations, which naturally produced different versions.
Why the Nanaimo Bar Became a Canadian Classic
The Nanaimo bar succeeded partly because it was practical.
It required no oven, used ingredients that were widely available, and could be prepared ahead of time. It also travelled well, making it ideal for church events, school functions, family gatherings and community bake sales.
Over time, a regional dessert associated with Vancouver Island became something much larger. The Nanaimo bar appeared in cookbooks across Canada and eventually became one of the country’s most recognisable desserts.
Its popularity has also made people unusually protective of it. Discussions about the “correct” thickness of the base, filling and chocolate topping can become surprisingly serious, especially among people who grew up with a particular family version.
How to Store Nanaimo Bars
Nanaimo bars should be stored in an airtight container in the refrigerator.
They will usually keep well for up to 5 days.
If stacking them, place parchment paper between layers to prevent the chocolate from sticking.
For the best texture, allow refrigerated bars to sit at room temperature for a few minutes before serving.
Can You Freeze Nanaimo Bars?
Yes. Nanaimo bars freeze very well.
For best results:
- Cut the bars into individual squares.
- Place them on a tray and freeze until firm.
- Wrap each square individually or separate layers with parchment paper.
- Store in an airtight freezer-safe container.
They can be frozen for up to 2 months.
Thaw them in the refrigerator rather than leaving them at room temperature, which helps reduce condensation on the chocolate.
Frequently Asked Questions
Are Nanaimo bars baked?
No. Traditional Nanaimo bars are a no-bake dessert. The layers are assembled and chilled in the refrigerator until firm.
Why is it called a Nanaimo bar?
The dessert is named after Nanaimo, British Columbia. While its exact invention is disputed, the city played the most important role in naming and popularising the dessert.
What is the middle layer made of?
The traditional filling is made with butter, icing sugar, milk or cream and custard powder. It is similar in texture to buttercream rather than a cooked custard.
Can I make Nanaimo bars without custard powder?
You can make a similar dessert without it, but the flavour and colour will be different. Custard powder is one of the ingredients most closely associated with the traditional version.
Why does the chocolate topping crack?
Chocolate can become brittle when fully chilled. Adding butter helps, but cutting the bars while the topping is set yet not completely hard usually produces cleaner slices.
How long do Nanaimo bars last?
Stored in an airtight container in the refrigerator, they generally keep well for about 5 days.
Can Nanaimo bars be frozen?
Yes. They freeze well for up to 2 months when properly wrapped and stored in an airtight container.
Final Thoughts
The Nanaimo bar may never have a single, universally accepted origin story. Similar recipes existed under different names, and the exact inventor remains unclear.
What is much easier to establish is why the dessert endured.
A crumbly cocoa-and-coconut base, a rich custard-flavoured filling and a thin layer of chocolate make for a combination that is simple but unmistakable. It is easy enough for a home baker to make, sturdy enough to bring to a gathering and distinctive enough to inspire decades of debate over what counts as the perfect version.
Whatever its true beginning, the Nanaimo bar became a Canadian classic the old-fashioned way: by being good enough for people to keep making it.
